Using an Insert Jack as a Direct Out
When connecting a mixer to a digital audio interface or multi-track recorder, you normally connect the Direct Out jack of each mixer channel to a track’s input on the interface. For example, let’s say your kick drum mic is connected to channel 1 of the mixer. If you wanted to record the kick drum to track 1, you would connect the channel 1 Direct Out to the track 1 input of the interface. You would then connect the channel 2 Direct Out to the track 2 input of the interface, etc. Using the Direct Outs in such a way takes each channel’s signal post-fader and post-EQ and sends it straight to the recording device. This allows you to record that one instrument (and only that instrument) to its corresponding track on the recorder or in your DAW software.
But what if your mixer doesn’t come equipped with Direct Outs? Many lower-priced mixers, or mixers designed more for stage use, do not. It’s also common on many 16-channel mixers to only have Direct Outs on the first 8 channels. If your mixer doesn’t have Direct Outs (or doesn’t have enough of them), you could always use the Main L/R Outputs of the mixer, but there are only two of them. But the problem with this is that ALL of the channels in use will get mixed together and sent to those outputs, which is generally not what you want. If your mixer has Subgroup outs (or “buses”), you could use those, but on a 4-bus mixer, there are only, well–4 of them. So what’s a guy to do if he wants to record each mixer channel to its own track? Fortunately, there’s another alternative–the Insert Jack.

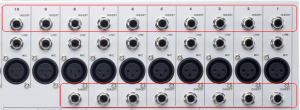
Fig 1: A Typical Mixer Patch Panel with Insert Jacks on every channel and Direct Outs only on channels 1-8.
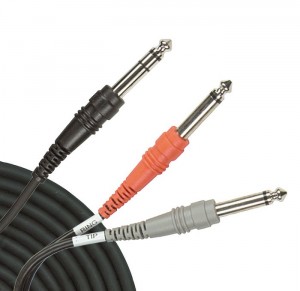
An Insert Jack is a TRS (Tip-Ring-Sleeve or 1/4″ stereo) jack that is typically used to connect a signal processor to only affect a single mixer channel. An example would be a compressor or noise gate that might be connected through the Insert Jack of a mixer channel to only affect a single vocal mic. To use the Insert Jack in such a way, you need a special Y-cable with a stereo TRS plug on one end (connected to the Insert Jack) and two mono TS (Tip-Sleeve or 1/4″ mono) plugs on the other end. One of the TS plugs is connected to the input on the signal processor and the other is connected to the output of the same device. So essentially, the Insert Jack creates a signal “loop” that both sends the signal for the channel out to an external signal processor and then returns it back to the mixer, all through a single jack (the Insert Jack). However, if you’re not using an Insert Jack for its intended purpose (and you often will not), it has a handy second function–as a Direct Out.
There are a few different ways of using an Insert Jack as a Direct Out. First, you can use a standard TS to TS patch cable. Plug the cable all the way in to the Insert Jack. The only drawback here is that the signal is sent to the recorder from the Insert jack, but the signal is “interrupted” and is no longer sent to the mixer’s main outputs. This may be okay for some recording situations, but in other cases, you will want the signal passed on through to the main outputs as normal, for monitoring purposes or for connection to a power amp and speakers in the case of a live concert.
The next option using a regular TS to TS cable is to only plug the cable in to the “first click” of the Insert Jack. This will tap the signal and send it straight out to the recorder, while still allowing it to pass on through to the mixer’s main outputs. The only drawback to this is that if you don’t get the cable plugged in just right (to only the first click), you may end up with either no signal to your recorder or no signal to the main outputs (or both).
So a better alternative than the “first click” or the “all-the-way-in” method is to use a special cable or adapter that both passes the signal for the channel to the send of the Insert Jack but still passes it on through to the mixer’s outputs as normal. To do this, you can use a Stereo Plug to Mono Jack adapter with a normal mono TS to TS cable. Or you could buy a special Insert Direct Out cable adapter, such as this one by HOSA.
However, if you’re like me, you like to keep your connections and cable runs as simple and clean as possible, in which case you don’t like using adapters or plugging cables into cables. So in my opinion, the most elegant alternative is to use a single, specialized cable for just this purpose. Assuming that you have some very basic soldering skills, this cable is very easy to make, which I will now describe.
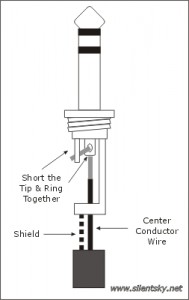
Start with a regular mono patch cable with TS plugs on both ends. Remove one of the plugs from the end with some wire cutters or tin snips. Now, solder a stereo TRS plug onto that end of the cable, shorting the Tip and Ring together, and connecting the shield to the Sleeve as normal. This will effectively send the signal to the output of the Insert Jack, while simultaneously returning it to the mixer, which will pass the signal on through to the Main outputs.
Some audio snobs might scoff at such a technique, saying that an Insert Jack wasn’t designed to be used this way, and therefore it shouldn’t be. However, some audio purists argue that for recording purposes, this method might actually be superior to using a Direct Out, because the signal path should be the shortest, cleanest, and most uncolored. The reason is that the signal is being sent directly from the preamp to the recorder, without going anywhere else. It’s not passing through the EQ or even the fader, which could, in theory, color or degrade the signal.
Now, of course, like anything else, there are some pros and cons to using this technique. We’ve already covered the pros, so now for the cons. First, when using this technique, the only control that you have over the level of the signal being sent to the recorder is the Trim or Gain knob on your mixer. Because the Insert Jack is pre-fader, the fader becomes useless in terms of the signal being sent to the recorder. However, the fader will still control the level of the channel in the main mix. Second, when using this technique, you are bypassing the EQ, so if you like to use some EQ for preliminary shaping of the recorded track, you’re out of luck. But in most cases, I don’t use any EQ when tracking. I use the parametric EQ built into my DAW software for shaping the sound of my tracks after recording, so this isn’t really a concern for me. Finally, if you’re using the Insert Jack as a Direct Out, you can no longer use it as an Insert. So if you wanted to patch a Compressor into the channel to tame some peaks, you’d have to connect it another way (i.e.: Insert to Compressor to Recorder).
In conclusion, if you need to do some multitrack recording, but don’t have a mixer that’s equipped with Direct Outs (or enough of them), the Insert Jack makes a handy replacement. Or if you’re an audio purist who wants the cleanest and shortest possible signal path between your mic and recorder, the Insert Jack may be the way to go.
 November 6, 2009
|
Posted by Jon (admin)


 Categories:
Hi,
I’m looking to use this technique on an analog Tascam Portastudio 424, but I saw in this thread that it shouldn’t be done with an analog recorder: “totally unacceptable for recording to analog recorders”
http://homerecording.com/bbs/showthread.php?t=271980
I don’t mind recording only after the preamp without going through the EQ and fader, and I don’t understand why won’t it work well with my 4 track, What do you think?
It should work just fine with your 424. Funny, my very first multitrack recorder was a Portastudio 424–ah, memories. The purpose of the trim knob on a mixer is to take a mic-level signal and boost it up to a line-level signal. Then the fader just controls the volume. In turn, the 1/4″ inputs on most multitrack recorders and recording interfaces are designed to handle a line-level signal. Therefore, using this technique is perfectly acceptable. If anything, it would be more acceptable on an analog recorder (such as your 424), because tape is much more forgiving of sharp transient peaks than what digital is. So you could acutally be a little more careless in setting your levels to prevent any clipping (not that I would ever encourage being careless). So if anything, I would say it would be more acceptable on an analog recorder.
Great guide. Exactly the info I was looking for. Could you please give a more (dumbed down) detail for the creation of the insert cable so I don’ t have to struggle with a “first click”.
Here is my set up. Live recording using the insert out of a peavey md16, to a zoom r16.
Thanks if you have time to write back.
Nick
Hi Nick, it’s really not too much of a struggle to find the “first click”. just plug your cable in, but don’t push it all the way into the jack. Just try it–you’ll know it’s working and you’ve found the first click when it sends a signal to your recorder and still passes sound uninterrupted to the main outputs, headphone out, etc. of your mixer. To make your own custom cable that you can plug all the way in and it still pass signal:
Take a Mono/TS patch cable and cut the plug off of one end.
Get a Stereo/TRS 1/4″ plug and solder it to the end, connecting the shield as normal to the Sleeve
Connect the center conductor wire (there should be only one if it was a Mono/unbalanced cable) to both the Tip and the Ring.
Best deal for an insert to direct out adapter is Radio Shack part #274-1520. It is essentially a 1/4″ stereo to 1/4″ mono adapter. Short and sweet and only $2.89 each. Beats the heck out of $8 and up for the Hosa DOC cable that does the same thing. Yes you can make your own, but price out the parts and at best it will be a wash with the Radio Shack adapter. Here is the link:
http://www.radioshack.com/product/index.jsp?productId=2103725
Hey, thanks for the comment. You’re absolutely right–the Radio Shack adapter is another option, but I’m a little OCD in that I generally don’t like to use adapters. An adapter is yet another connection that can potentially degrade or cause problems with the signal, so I like to make my own cables to create a path of least resistance, so to speak. Also, since the Radio Shack adapter still requires you to purchase a patch cable to plug into it, I believe creating your own cables as I describe here would actually be cheaper, since you only have to buy a 1/4″ TRS plug, which you can get on Ebay for around $1 or $2 each. Of course, it requires a little bit of time to do the soldering, but that part doesn’t bother me.
@Admin:
I generally agree that using adapters is not the most desirable. In my case and I guess many others, the TS to TS patch cable has already been bought and one option being considered is the “first click” method. This is perhaps the least desirable since the connection at the insert is somewhat iffy. If you already have the TS to TS patch cables then the Radio Shack adapter is significantly cheaper than either making your own adapter or plopping down $8 to $10 for a HOSA adapter cable. But as you point out in the blog, you can modify a TS to TS patch cable to a TS to TRS insert to direct out cable by simply replacing one of the plugs. If you do not want to sacrifice an existing TS to TS cable you will either have to buy/make an adapter or make an entirely new cable. But we both agree if you can avoid an adapter, then by all means avoid it. It is simply a question of economics versus method and flexibility. Thanks for creating the guide. It is well written and a good resource for a scenario that many people will encounter.
I’m trying to find a 24 channel desk for live sound but want a few direct out type connections for controlling monitor mixes on stage, perhaps this will help.
Thanks for this! Bookmarked!