Acoustic Treatment 101
 April 8, 2016
|
Posted by Jon (admin)
April 8, 2016
|
Posted by Jon (admin)
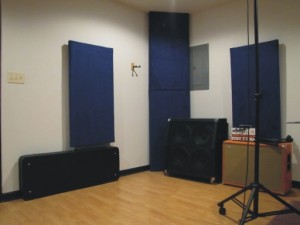
A while back, I received an e-mail from a friend asking me about acoustic treatment options for a practice room that he is setting up in the basement of his home. He plays the drums and guitar, and he said that the reflections in the room were terrible. Knowing that I had spent a lot of time and money on treating my studio, he was curious about what I had used, and what I would recommend that he do for his room.
I never realized just how important acoustic treatment was until I began building my own recording studio and researching the topic. There’s literally tons of information out there: some good and some not-so-good. There are also lots of different opinions on the subject, and some folks are very passionate about their opinions! Go search some pro audio forums, and you’ll see what I’m talking about. There’s also not 100% agreement when it comes to what materials to use, how much to use, and where to put them. After replying to my friend’s e-mail, I decided that this information might be helpful to other folks out there who are new to the idea of acoustic treatment, so here we go…
First, let’s talk some general considerations for acoustic treatment. Contrary to popular belief, the goal should not be to cover every hard surface in the room with something soft. That will create a very unnatural room that seems to suck the sound of it. That’s not what you want. Instead, the goal is to add enough soft surfaces to break up the unnatural slap-back echo that occurs in a room with all hard surfaces and to even out the bass response in the room (which can keep some bass notes from being unheard while others are overwhelming). Note that acoustic panels are not the only tool at your disposal. You can throw down some rugs on the floor, or even put a soft couch and/or chairs in the room if you’ve got the space for them. When it comes to panels, there are 2 general types: broadband absorber panels which are hung on the walls or ceilings (they are sometimes called “clouds” when hung from the ceilings) and “bass traps” which tend to be thicker and are mounted in the corners of the room. Now let’s talk about some of the specific materials that can be used.
The first option is fabric-covered fiberglass panels. This is generally the best (and most expensive) option. Instead of buying ready-made panels, I went the semi-DIY route by purchasing Owens Corning 703 Rigid Fiberglass boards from a local insulation supplier and covered them with a product called “Ready Bags” by Ready Acoustics. The Ready Bags are basically zippered covers with straps sewn into them for hanging them on the walls. I purchased 4″ thick bags for my corner bass traps and 2″ thick bags for the wall panels. By most home or project studio standards, these were pretty expensive. Altogether, I paid close to $2000 for the Ready Bags and fiberglass boards to treat my tracking and mixing rooms. But from all of the research that I did, this is the type of panel that’s used in most professional studios, it’s the most effective, and it looks nice too. The semi-DIY route saved me some money, but it required a lot of extra time and work on my part. I also got very itchy from working with the fiberglass! In fact, if I had to do it over again, I would probably spend the extra money and buy ready-made panels.
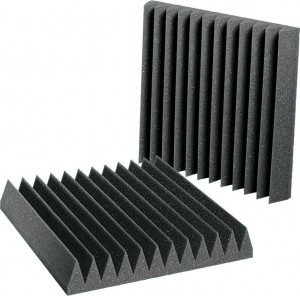
The next option for teating a room is “acoustic foam”. Foam is generally more affordable and easier to work with than fiberglass panels. Before I built my studio, I used some foam panels in a spare bedroom, and it worked ok for taming the mid and high frequency reflections. I glued them to the walls in the bedroom, so it was a real mess trying to remove them later on. If I had it to do over, I would use some spray adhesive to glue the foam panels to some 2′ x 4′ sheets of pegboard or thin plywood. Then you could just hang them on the wall using a picture-hanger or some wire and a couple of screws. You can also buy foam versions of bass traps, which are usually triangle-shaped so they fit neatly in the corners of the room.
One final option if you have a VERY limited budget and absolutely cannot afford anything else, is to hang heavy blankets on the walls or from the ceiling about an inch or two off the walls. These won’t be nearly as effective as fiberglass or foam and they will not look very professional, but they will be better than nothing. If you go the blanket route, look for heavy blankets with grommets installed on one edge if you can find them–they will be much easier to hang than regular blankets.
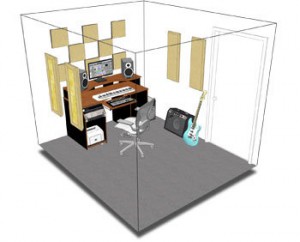
As far as the placement of your panels and how many to use, the bass traps should be stacked floor-to-ceiling in each corner of the room. For the rest of the panels, just hang them on the walls, leaving 2 or 3 feet of space between each panel, with the short side (2′) parallel to the floor and ceiling and the long side (4′) parallel to the walls. You might also want to alternate the height at which you hang the panels (I did not). For the ceiling, I would place a few panels at strategic points around the room: above the drums, above any guitar/bass amps, and above your monitor speakers. This will help to minimize the reflections from those sound sources off the ceiling.
When trying to determine the total number of panels needed, sketch out a floor plan of your room either by hand or using some software, and then add panels to the diagram (to scale if possible) so you can roughly see how much coverage you’ll have when the job is done. Some acoustic panel companies will even do this for you if you provide the dimensions of your room.
In the end, acoustic treatment is a worthwhile investment that many small studio owners overlook. It’s going to make any instrument, voice, or speaker sound better in your room, which will translate to better recordings and mixes. There are several options available to fit any budget. You can save even more cash by building your own panels if you have more time than you do money. So treat your room today–your mixes will thank you for it.
To check out some pictures of my own studio, see how many panels I used, and how I arranged them, check out the photo gallery on my studio website by clicking here.
If you’ve found this article helpful, you can support this site by cliking the graphic below to shop for acoustic treatment at Zzounds.
![]()
 Categories: Recording, Tips for Artists & Bands, Tips for Engineers
|
Categories: Recording, Tips for Artists & Bands, Tips for Engineers
|  Tags: acoustic, band, fiberglass, foam, panels, Recording, rehearsal, space, studio, treatment