Samplitude 11 Producer: Part 2
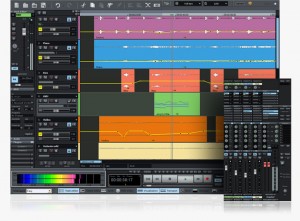
In Part 1 of this series, we covered the evolution of Samplitude 11 Producer as a product. Here in Part 2, we’ll begin to cover some of the highlights of the software in detail. First, we’ll begin with the Arrange window. The Arrange window is where you see a visual overview of all of the tracks in your project, as well as one or more Wav files or MIDI passages on each track. It’s in the Arrange window that you can do things like zoom in on a track and perform delicate editing on a particular passage. Depending upon the zoom level, you also have common track functions available on each track–controls like Volume, Pan, Mute, Solo, and Record (to arm the track for recording). Also on each track, you will see one more “objects” that represent the Wav files or MIDI passages that have been recorded on that track. This brings us to one of the nicest features of S11P–object-based editing.
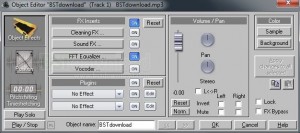
By double-clicking on an object in a track, it brings up the Object Editor dialog, which includes a host of controls that you also have at the Track level–Pan, Volume, the ability to insert VST plugins, etc. What this means is that if you only want to apply an effect to a certain passage of a track in a song, you can simply split the object (take a single object and break it up into multiple obects) for that track, select the new object, and apply your effects to only that new object. One example where I’ve used this feature was during a section of a song where the drum groove was featured prominently by itself. I split the objects on the Drum Overhead tracks and applied a Flanger effect, which helped to add a little pizzazz to an otherwise somewhat dull-sounding section. Using this object-oriented technique works out much better than having to apply the effects to the whole track and then turn them on/off using automation, or for that matter, duplicating the entire track and then muting/un-muting the dry and effected tracks appropriately. We’ll look at at the Object Editor in more detail in a future post.
Also in the Arrange window, you have the Track Editor. The Track Editor gives you an expanded view of the currently-selected track, providing access to just about any control that you would need over it. This way, even if you have your zoom level set to a minimum (so that you don’t see the individual controls on each track), you can still access the track’s controls in the Track Editor by simply selecting it. The Track Editor is divided into several sections, each of which can be expanded or minimized. The first section includes general track controls such as Solo, Mute, Record, Monitor, Peakmeter, Volume, Pan, FX presets, and a MIDI button to toggle a track between being an audio or a MIDI track. The second section (Automation) provides access to enable automation on either the track or VST plugins. The third section (MIDI) provides the MIDI routing and selection of VST Instruments. The fourth section (Audio) contains the audio input/output routing and an input gain control. The fifth section (Plugins) allows access to VST or DirectX plugins, as well as the built-in Sound FX rack and Dynamics processor. The sixth section (Aux) provides control for the track’s Aux Sends. The fifth section (EQ) provides acess to the track’s Parametric Equalizer, which can also be opened in its own dialog with a right-click. The last section (Comments) allows a free-form text area for you to make any notes that you might need to remember about the track.
When working in the Arrange window, you’ll also frequently be working with the Transport control. The Transport provides all of the common controls for a tape machine: Play, Record, Stop, Fast Forward, Rewind, and a Jog wheel. It also provides access to project-level settings such as Unit of Measure, Markers (Go To/Set/Delete), Punch In/Out Points, enable Punch mode, Midi Record mode, Loop, Monitor, Tempo, Bars/Beats, Metronome on/off, and Beat/Grid Snap.
As you can probably guess, there’s a whole lot more in the Arrange window that could be covered here, but for now, we’ll leave it at that. Check back for my next post where we’ll cover the Mixer window.
Shop for Samplitude ProX or Producer at Magix.com:
Shop for other software titles at Zzounds:
 June 8, 2010
|
Posted by Jon (admin)


 Categories:
  Tags:
Tags: 