Samplitude 11 Producer: Part 3
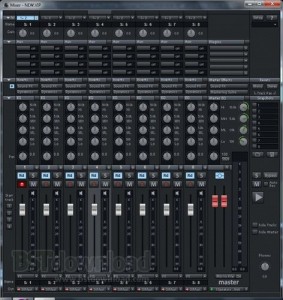
In this installment in my series of articles on Samplitude 11 Producer, we’ll cover one of the features that I use probably more often than any other: the Mixer window. I believe that the virtual Mixer is probably one of Samplitude’s strongest points. I’ve used some other DAW software in the past where all of the mixing controls were accessible from the equivalent of S11P’s Arrange window (the main user interface where most of the editing is also performed). This works okay, but for someone who’s accustomed to working with a real mixer, it takes some getting used to. On the other hand, S11P’s Mixer window is laid out almost identically to a real hardware mixer. The only difference is, if you don’t have enough mixer channels, you don’t have to buy a new mixer–you can just add channels with a mouse click (cool, huh).
Another nice thing about having a separate window for your Mixer is that it works great on computers with a dual-monitor setup. I have two monitors, and when working in S11P, I always keep the Arrange window open on the left monitor and the Mixer window opened on the right monitor. This makes my workflow far more efficient than doing everything from the Arrange window or having to constantly open and close the Mixer window.
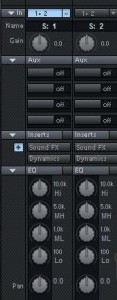
S11P’s Mixer window is made up mostly of Channel Strips–each of which is identical to one another. In turn, each Channel Strip is made up of several sections. Several of these sections can be expanded or minimized to show or hide its detailed controls. This is helpful if you’re using a smaller computer monitor and don’t have enough real estate to view everything on the screen at once. At the top of each Channel Strip is the input source. This is what determines which channel of your recording interface is routed to this channel on the Mixer. Just below that is the Input Gain control. This is equivalent to the Trim knob on a hardware mixer. If your source for the track was recorded too quietly to have enough volume out of just the fader, you can adjust the Input Gain to boost it. Conversely, if a source was recorded too hot, you could reduce the Input Gain here and use the fader to make fine volume adjustments.
After the Input Gain comes the Aux Sends. You can have up to a maximum of 4 Aux Sends in the S11P Mixer. These are useful for setting up a single Reverb plugin that you may want to use for multiple tracks. You can simply add an Aux, add a Reverb plugin to its insert, and then set the level of the Aux Send for each track for which you want to add the Reverb. Instead of knobs, the Aux Sends are adjusted by clicking and dragging across the bar for each Send. My only guess is that the bars were used instead of knobs just to save space on the screen. It’s a little different, but not bad once you get used to it. There’s not much else to tell about the Aux Sends, except that they are Post-Fader, which is how you would normally want an Aux Send to be set up when mixing a recording. I will note that in the Pro versions of Samplitude, there is a Routing Manager that allows you to change the routing to make the Aux Sends Pre-Fader.
The next section of the Channel Strips are the Inserts. The Inserts are where you would add any VST or Direct X plugin effects to an individual track or to an Aux channel. You can add plugins to the Insert slots by simply clicking the down arrow for each one, and then choosing the one that you want. You can change the order of your plugins by simply clicking and dragging one from one slot to another. You can also right-click on the Inserts section to open an Inserts dialog. Just like the Aux Sends, the Inserts are Post-Fader. I repeat–the Inserts are Post-Fader. This is probably my only complaint about S11P. In my experience, for an Insert to be an Insert, it is inherently pre-fader. I’ve never in my life seen a hardware mixer with Insert jacks that were post-fader. That being said, it seems that if the Inserts were going to be one or the other (pre or post-fader), they should most definitely be pre-fader. With the way that the Inserts function now (post-fader) they operate more like a “Direct Out with Loopback” (if such a thing existed) than an Insert.
The Inserts being post-fader has caused several problems for me when using various plugins. The plugin that I have the most trouble with is Aptrigga. Aptrigga is a sample-replacement plugin that can be used to trigger a Kick or Snare Drum sample from a recorded track. Because the trigger reacts differently based on the input signal that it’s receiving, it messes things up when I try to adjust the Track Volume via the fader. It may cause the plugin to trigger when it should not (if you raise the fader too high), or it may keep it from triggering when it should (if you lower the fader too much). If I make any adjustments to the Track’s volume Fader, I then have to re-adjust the threshold in Aptrigga to ensure that the sensitivity is set properly (which is a real pain). Noise Gate plugins also suffer from pretty much the exact same problem as I’ve described it here, and for the same reasons.
Another example of a plugin that this causes problems with is a Compressor. A Compressor responds differently based on the strength of its input signal, so that when you adjust the fader, it doesn’t just change the track volume as it should–instead it drives the compressor more or less, which affects the resulting sound (sometimes in a not-so-pleasant way). I did contact Magix Support over this issue, and received the following response: “I actually did ask for this based on your last email to see if the order can be changed. It is in the developers suggestion box.” So I’m hopeful that this will be addressed in a future patch or update.
All of that being said, there are a few workarounds for this–first, you can add any level-sensitive VST’s in the Object Editor instead of in a Mixer Insert. Second, you can use a Volume Fader VST in the last slot of your VST Inserts in the Mixer. Then you can use the VST Fader to make volume adjustments instead of the Mixer Fader. Finally, you could route a track to a Submix Bus and use the Submix Bus for any volume adjustments, leaving the individual track’s Fader at Unity Gain (0).
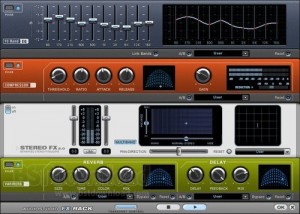
To round out the Inserts section, you have the built-in Sound FX and Dynamics processor. The Sound FX rack consists of 4 processors–a 10-band Graphic EQ, Compressor, Stereo FX 2.0 (Stereo Enhancement), and Variverb (reverb). The Dynamics section is a simple dialog-based compressor/limiter/gate (no fancy user interface). These effects aren’t bad, but I’ve had better luck using third-party VST plugins, both commerical and free.
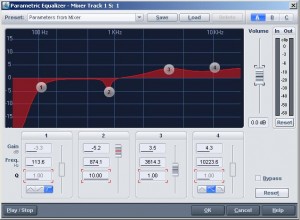
After the Inserts section, you have the channel EQ. This is another strong suit of the S11P Mixer. The EQ is a 4-band Parametric that can either be adjusted using the knobs in the Mixer, or you can open the full-fledged EQ dialog window by right-clicking on the EQ section in the mixer. The Hi and Low knobs can be set to Shelving, High Pass/Low Pass, or a Bell-Shaped curve. The two mid frequencies are a fixed Bell-Shape. For each band, you can adjust the frequency, Q (width), and the level of Boost or Cut. There’s also a handy Presets dropdown box that contains a collection of presets for various instruments. I typically will start with one of these presets and then just make some tweaks until I find a sound that works well for the track.
After the EQ section, we come to the Pan knob. The Pan knob obviously controls the Panorama–the left/right balance of the channel in the mix. If you right-click on the Pan knob, it brings up the Pan dialog. This dialog gives you considerable control over the Panorama settings of the track (including Surround settings) and also allows you to control Automation for the track’s Pan settings.
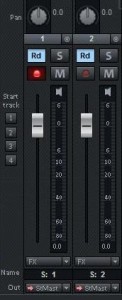
Below the Pan knob, there’s a collection of several useful buttons. First is the Link button. This button allows you to link the channel to the adjacent channel to the right in the Mixer. This is useful if you have a stereo source recorded to two separate tracks, such as Drum Overhead mics. When the Link button is depressed, any movements to the fader for the one channel also makes the same movements to the other linked channel. Likewise, any changes to the Pan knob makes the opposite changes to the Pan knob for the linked channel. For example, if you turn the one channel’s Pan to the left, it will turn the linked channel’s Pan knob to the right.
The next button is marked “Rd”, which is an abbreviation for “Read”. This makes the Automation Read function active. When you click the button again, it makes the Automation Write function active. When in Write mode, if you click the Play button in the Mixer or the Transport, any movements made to the channel’s fader will be recorded. After you’ve recorded your automation moves, you can click the Rd button again to make Read mode active again. Now, upon subsequent playback, any moves that you made will be made in real time in the mixer. This is great for boosting a certain part during your mix (such as a guitar solo) or reducing a certain part during a softer passage.
Next is the “S” button, which stands for Solo. The Solo button basically works like a “reverse Mute”. When this button is clicked, you will hear only the track/s that are Solo’d upon playback. This is great to isolate a single track or a few tracks if you need to hear them by themselves. Next we come to a button with a red dot on it. This button is used to arm tracks for recording. When the button is depressed, the red light is illuminated. When it’s not depressed, the red light is turned off, meaning the track is not armed to record. Next is the “M” or Mute button. As you might have guessed, this button mutes the audio for any tracks for which it’s depressed. Below the Mute button is a button with a picture of a speaker on it. This button is used to manual turn monitoring on or off for a given track. I normally only use this button when working with MIDI tracks, as I normally do my monitoring for audio tracks using an external mixer or the software mixer for my recording interface.
Next we come to the channel fader. The fader is used for making volume adjustments to a track, and will probably get used as much if not more than anything else in the Mixer window. Below the fader is an “FX” dropdown box. This contains some channel effect presets that are tailored to certain instruments. These presents include a combination of Compression, EQ, Reverb, Delay, etc. Below the FX is the track’s name. This descriptive text simply identifies the track as “vocals”, “guitar”, “snare”, etc. By default, the tracks are just numbered. You’ll have to double-click on the text to edit it. Below the track name is the track’s Output Routing. Normally, all our your tracks would probably be routed to the main stereo outs of your soundcard. However, if you decide to use any Subgroups (busses) in your mix, it’s here that you would assign the track to that Subgroup. Also, if you are mixing “Out of the Box” using an external analog mixer, it’s here that you would assign each track to the appropriate output of your interface/sound card.
Wow, after all of that, we’ve only covered the Channel Strips. Check back for my next post, when we’ll cover the Master Section of the Mixer.
Shop for Samplitude ProX or Producer at Magix.com:
Shop for other software titles at Zzounds:
 June 24, 2010
|
Posted by Jon (admin)


 Categories:
  Tags:
Tags: 
hello
I have samplitude 11 producer and i cant get my vst to work. Am using a M-audio keystation via usb, windows 7. I can hear the generic midi sound banks that midi supplies but when i chose the third party vst like F8 for example, it won’t play. I tried everything, from Rewire to installing Asio4all a few times but no luck.
thanks for your time
Hi Oscar, sorry to hear about your trouble. You should try posting on one of these forums:
http://support2.magix.net/boards/magix/index.php?showforum=46 or http://support2.magix.net/boards/samplitude/index.php
You might also want to check out some of the MIDI tutorial videos on the Samplitude website:
http://www.samplitude.com/us/community/tutorial_videos/midi__vst.508.html
Jon, I just discovered your series on Samplitude, and have found it very interesting and informative. I was disappointed to see that it seems to end here, with part 3. Have I missed other installments, or do you plan to continue the series?
Thanks for taking the time.
Thanks I’m glad you’ve enjoyed the articles. I’ve actually written a couple more, but haven’t gotten around to finishing them up and publishing them just yet. I’ll try to do that in the near future, though, so check back soon.