Behringer iNuke NU4-6000/NX4-6000 4-Channel Power Amplifier Review
 June 22, 2019
|
Posted by Jon (admin)
June 22, 2019
|
Posted by Jon (admin)
For a number of years, my live sound system was limited to only two monitor mixes shared between 4 stage monitor speakers. So for a typical 4-piece rock band, the drummer & bass player might share a mix, and then the guitar player and singer would share a mix. Each band member had their own monitor speaker, but they did NOT have their own monitor mix. There were two reasons for this. First, my old analog mixer only had two pre-fader aux/monitor sends. Second, the power amp that I used for my monitors was a standard stereo/2-channel amp. However, when my analog mixer bit the dust, I purchased a new Behringer X-Air XR18. The XR18 has 6 Aux Buses, each of which can be assigned as a pre-fader monitor send. This opened up some new possibilities for me: if only I had a 4-channel power amp, I could run 4 separate, independent monitor mixes–one for each speaker. Enter the Behringer iNuke NU4-6000, a 4-channel amp that seemed to be tailor-made for my intended purpose.
First, let’s look at the specs of this amp from the Behringer website:
• 315W RMS/440W peak @ 8 ohms per channel
• 680W RMS/860W peak @ 4 ohms per channel
• 1040W RMS/1600W peak @ 2 ohms per channel
• 1250W RMS/1600W peak @ 8 ohms per bridged pair
• 2050W RMS/3000W peak @ 4 ohms per bridged pair
• Weight: 12 lbs / 5.5 kg
• Class-D technology with near zero thermal buildup
• Switch-mode power supply
• Peak limiters for overload protection
• Built-in stereo crossover with low-cut, high-cut, and full-range modes
• Detented and illuminated gain knob for each channel
• 4-segment signal and limit LEDs per channel
• XLR and 1/4″ TRS combo jack input connectors
• Speakon output connectors
• DC, LF and thermal overload protection on each channel
• Back-to-front ventilation
• 1 year warranty can be extended to 3 Years if you register within 90 days of purchase

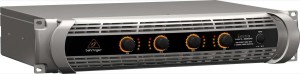
Let’s begin by going over the various controls and indicators on the amp. First, there’s a power switch and 4 Input Gain knobs on the front. For each channel, there’s also a 4-segment LED meter to indicate signal present (the bottom 3 orange LED’s) and clip (the top red LED). These LED’s should be used for setting the input levels to ensure that you’re getting a good signal-to-noise ratio, and that you aren’t clipping the amp’s input (for more details, refer to the “Setting Levels” section below).
On the back of the amp, we find more controls. For each pair of amps built into the chassis, there’s a mode switch with 3 settings:
Stereo: both channels operate independently of one another.
Mono: the same signal is sent to both channels, but the Input Gain control affects each one separately.
Bridge: the outputs of both channels/amps are combined into a single, high-powered speaker output.
Also on the back are the crossover controls, which again offer 3 settings:
Full Range: the full signal that’s being fed to the input/s is fed to the output/s unaffected.
High Pass: a low cut/high pass filter set at 100Hz is applied to the input signal.
Low Pass: a high cut/low pass filter set at 100Hz is applied to the input signal.
According to a thread on the Prosoundweb forum, it appears that on some (presumably early) production runs of the NU4-6000, the crossover controls were different than what is documented in the manual. On those models, there were only two positions: “full range” or “A=HF/B=LF” and “C=HF/D=LF”. This was a less flexible configuration, and didn’t allow you to use A/B in stereo HF mode to power your mid/high top cabinets and C/D bridged for your subwoofers, which is probably one of the more common ways that a live sound engineer might want to use this amp. Therefore, the later design with the 3-position crossover is more flexible and preferred. So watch out for models with the older, 2-position crossover switch if you’re buying a used NU4-6000. My amp matches the manual and website though, and since I’m using it to power 4 full-range monitors (as opposed to subs & tops), this was a non-issue for me.

Also on the back are the input and output connections. For inputs, each channel offers an XLR/TRS combo jack, so you can use either balanced XLR or 1/4″ TRS cables for connecting your mixer’s outputs to the amp’s inputs. For the speaker outputs, you have standard Speakon twist-lock connectors–one for each channel. Missing are the binding post/banana plug jacks that you commonly still see on many power amps. So if you don’t already have speaker cables with Speakon connectors, you’ll need to replace your connectors or buy new cables.
Now that we’ve thoroughly covered the specs, I’ll briefly discuss what I do and don’t like about this amp. First off, I really like the weight. At around 12 lbs for a 4-channel amp, you could easily be replacing 2 stereo amps that weigh 35 or 40 lbs each. So you’re trading up to 80 lbs for 12. That’s awesome. The amp’s chassis is also not very deep from front to back, so a smaller, shallow-depth rack case may work instead of the deeper rack cases required by many other power amps. The amp also sounds quite good and provides plenty of power for my application. I’m using each channel to power a single Yamaha CBR12, which handles 175 watts RMS. My general rule of thumb is to try and use an amp with double the RMS rating of my speakers, so at 315 watts RMS per channel at 8 ohms, the NU4-6000 is just shy of that (175 x 2 = 350), but I haven’t found myself pushing the amp too hard or feeling like I didn’t have adequate power to achieve the volume I need on gigs before clipping.
And now for a few things that I’m not too crazy about. First off, much of the amp is made of plastic and makes you wonder at first if you’ve purchased a toy or a serious piece of pro audio gear. But given that one of the goals of the iNuke series was to make them very lightweight, I’m willing to cut them some slack for this. My other complaint is the handles on the front of the amp. These handles stick WAY out in the front, so much so that you may not be able to fit the front lid on your rack case. My old case had lids that were flush with the edge of the case. This worked fine with the old EP series of Behringer amps (EP1500, EP2000, EP2500, EP4000), but it was a total no-go with this amp. I actually had to buy a new rack case that allows the gear to poke out the front of the case and into the lid in order to make room for the handles. In my opinion, this is an obvious design oversight, and if you have to buy a new rack case, that effectively adds to the cost of the amp. My final complaint is with the way the input and output connectors are arranged on the back of the amp. The 4 XLR/TRS combo inputs and Speakon output connectors are each arranged in a 2 x 2 layout, so making connections to the back of the amp can be difficult in such a tight space, particularly when you’re reaching into a rack case in a dark room where you probably can’t see so well. I would have preferred the connectors to be arranged in a 1 x 4 layout and spaced out a bit more, but that’s not the way it was done.
In spite of those few complaints, I’m very satisfied with the NU4-6000. It works very well for my application as a 4-channel monitor amplifier, and I suspect it would work equally well for powering some full-range main loudspeakers or some mid-high top cabinets plus subwoofers. If you find yourself in need of a flexible power amp that packs a lot of punch in a small, lightweight package, definitely consider the NU4-6000.
UPDATE: In 2019, Behringer began shipping the NX4-6000, a newly-updated version of this same amp. All of the controls, connectors, features, and specs appear to the same, except the new version sports Behringer’s new “SmartSense Loudspeaker impedance compensation”, which purports to give you “fully linear frequency response at any speaker load impedance”. It’s also worth noting that the NX4-6000 looks less like a toy and more like a traditional power amp with its more subdued charcoal gray finish, and it doesn’t have those oversized handles sticking out the front, which is a definite improvement, as it should allow the amp to more easily fit in a wider variety of rack cases than its predecessor.
Sidebar: Setting Levels
For anyone who’s interested, here’s how I typically set the levels for my system:
1. Make sure the amp & mixer are turned off.
2. Set the A/B/C/D controls on the amp to the full counter-clockwise/off position.
3. Turn on your Mixer.
4. Set the master output fader to 0, channel fader to 0, and turn the channel Trim/Input Gain all of the way down.
5. Play some program material (CD, MP3, etc.) and set the channel’s Input Gain to get a good strong signal, with the channel’s meter peaking somewhere between -10 and -6 dB.
6. Switch on the amplifier.
7. Adjust the A/B/C/D controls to set the input levels to the amp. I usually set it to where the second or third LED from the bottom is lighting up, and I try to set the level just a bit louder than what I think I will actually need during the performance.
8. Note that if the red Limit LED lights up continuously, you should lower the input control until it only lights up occasionally on the very loudest peaks (or not at all, if you want to be a bit more conservative). This should give you a good balance between signal strength & amp headroom. If you aren’t running sound for a particularly loud performer, you may find that you get sufficient volume by setting the input gain of the amp even lower, to where only the bottom one or two signal LED’s light up, and the Limit LED never lights up at all (this is preferred).
9. After completing steps 1 through 8, set the levels for the other channels (vocal mics, instrument mics, line inputs, etc.) needed for that monitor mix.
 Categories: Live Sound, Reviews
|
Categories: Live Sound, Reviews
|  Tags: amp, amplifier, behringer, nu4-6000, nu46000, nx 4-6000, nx4-6000, nx46000, power, Review